Azure DevOps Scale set agents (Part 2)

In my last post in this series, I outlined the issues I was having with VM build agents and my desire to be able to quickly spin up and tear them down. Looking at containers first, I decided that the recently GA VM Scale Set agents were the direction I wanted to go in. This meant that I needed to work out how to easily create a custom Azure VM image and install the software on it that our builds need. This is where Packer comes in.
What is Packer?
Packer is an open-source tool developed by Hashicorp. They describe it’s use as
"…automates the creation of any type of machine image. It embraces modern configuration management by encouraging you to use automated scripts to install and configure the software within your Packer-made images…"
It’s effectively an EXE that uses a JSON configuration file to create a VM image. You can add to this with your own scripts and with what Packer calls Provisioners and Builders . Provisioners are tools that can be called to configure the image once you have started it. Builders are platform-specific and are used to generate the images - we’ll be using the Azure builder.
The documentation for Packer is very good, but I like to supplement any official documentation with a few blog posts. Docs can be quite general, but if you can find a blog of someones experience using the tool in a scenario close to yours, then that will save a lot of time.
I managed to find an excellent blog by Sam Cogan detailing how to use Packer to create an Azure os image in Azure DevOps. You can’t get more perfect than that 😊
Creating my image
I followed Sam’s guide and it created me a working pipeline which produced an image. I could then use this image to create a scale set and everything was good. In the post, he talks about using DSC to configure the image, but I wanted to keep this process as simple as possible (I know applying a DSC config is quite simple, but meh). So I added a step in the configuration JSON to just run a PowerShell script. This script installs the software I need on the agent. You’ll notice that I have had to escape the \.
        {
            "type": "powershell",
            "script": "Packer\\Software-Install.ps1"
        }
I install Visual Studio as part of this script and I found that I needed to reboot the machine before the SYSPREP step or it wouldn’t complete. I’m not sure why, but once I added a reboot step, the problem went away.
        {
            "type": "windows-restart",
            "restart_check_command": "powershell -command \"& {Write-Output 'restarted.'}\""
        }
I was very keen to use Ephemeral disks to try and increase the provisioning speed of the instances and reduce the cost. This meant I could only use specific machine types, specifically ones that support premium and managed disks. I would also need to keep my disk image below the size of the VMs cache disk size.
I looked at the VM sizes and after some investigation (aka help and advice from colleagues) I went with a Standard_DS3_v2 which has a cache size of 50GB.
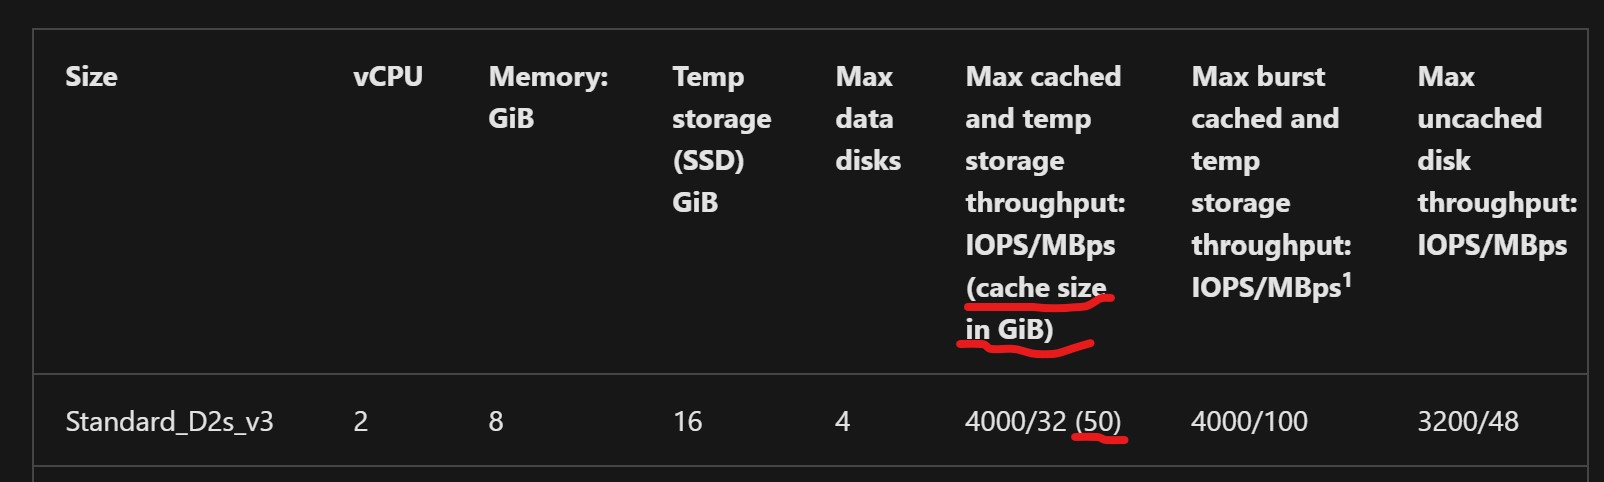
This isn’t tons of space, but Microsoft provides an Azure gallery image called 2019-Datacenter-Core-with-Containers-smalldisk which is 32GB. The image is windows server core, which is perfect for build agent and comes with the containers feature enabled. I would normally enable this anyway, so it saves me a job. The builds I tend to run are quite small, but if I wanted to extend the disk past 50GB I would only have to change the VM size and then increase the size of the disk in the config JSON.
So in the below line, you would just change 40 to 50 or whatever size you wanted to use.
"os_disk_size_gb": 40,
You would also need to include some PowerShell to increase the volume on the VMs disk. I forgot this step initially and it took me far too long to spot my mistake.
        {
            "type": "powershell",
            "inline": [
                "$size = Get-PartitionSupportedSize -DriveLetter C",
                "Resize-Partition -DriveLetter C -Size $size.SizeMax"
            ]
        }
This is needed if you have any disk size that doesn’t match your image size. If you are using a 127GB image on a 127GB VM disk, then you don’t need this.
My full JSON file is below, this combined with Sam’s excellent post gave me a customised working image that I could then use in a scale set
{
    "variables": {
        "client_id": "",
        "client_secret": "",
        "tenant_id": "",
        "subscription_id": "",
        "managed_image_prefix": "",
        "managed_image_resource_group_name": "",
        "PackageLocation": "",
        "WorkingDirectory": "{{env `System_DefaultWorkingDirectory`}}"
    },
    "builders": [
        {
            "type": "azure-arm",
            "client_id": "{{user `client_id`}}",
            "client_secret": "{{user `client_secret`}}",
            "tenant_id": "{{user `tenant_id`}}",
            "subscription_id": "{{user `subscription_id`}}",
            "managed_image_name": "{{user `managed_image_prefix`}}-{{isotime \"200601020304\"}}",
            "managed_image_resource_group_name": "{{user `managed_image_resource_group_name`}}",
            "os_type": "Windows",
            "os_disk_size_gb": 40,
            "image_publisher": "MicrosoftWindowsServer",
            "image_offer": "WindowsServer",
            "image_sku": "2019-Datacenter-Core-with-Containers-smalldisk",
            "communicator": "winrm",
            "winrm_use_ssl": "true",
            "winrm_insecure": "true",
            "winrm_timeout": "3m",
            "winrm_username": "packer",
            "location": "North Europe",
            "vm_size": "Standard_DS3_v2",
            "async_resourcegroup_delete": true,
            "azure_tags": {
                "Image": "windows2019DCCore-Latest"
            }
        }
    ],
    "provisioners": [
        {
            "type": "powershell",
            "inline": [
                "WINRM QuickConfig -q",
                "Install-PackageProvider Nuget -ForceBootstrap -Force",
                "Set-PSRepository -Name PSGallery -InstallationPolicy Trusted"
            ]
        },
        {
            "type": "powershell",
            "inline": [
                "$size = Get-PartitionSupportedSize -DriveLetter C",
                "Resize-Partition -DriveLetter C -Size $size.SizeMax"
            ]
        },
        {
            "type": "powershell",
            "script": "Packer\\Software-Install.ps1"
        },
        {
            "type": "windows-restart",
            "restart_check_command": "powershell -command \"& {Write-Output 'restarted.'}\""
        },
        {
            "type": "powershell",
            "inline": [
                "if( Test-Path $Env:SystemRoot\\windows\\system32\\Sysprep\\unattend.xml ){ rm $Env:SystemRoot\\windows\\system32\\Sysprep\\unattend.xml -Force}",
                "& $Env:SystemRoot\\System32\\Sysprep\\Sysprep.exe /oobe /generalize /quit /quiet",
                "while($true) { $imageState = Get-ItemProperty HKLM:\\SOFTWARE\\Microsoft\\Windows\\CurrentVersion\\Setup\\State | Select ImageState; if($imageState.ImageState -ne 'IMAGE_STATE_GENERALIZE_RESEAL_TO_OOBE') { Write-Output $imageState.ImageState; Start-Sleep -s 10  } else { break } }"
            ]
        }
    ]
}
This isn’t a lot to setup, but you may find that picking the right base image and machine size might take some time. In my next post (Which will hopefully come out quicker than this one) I will go through the deployment of the scale sets which should round this off nicely.
As always if you have any questions, please let me know in the comments.